School Messenger
How to Send Notifications & Manage Contacts
The intent of this training guide is to equip users with the primary skills required to quickly and confidently broadcast voice, text, email or social media messages to hundreds, thousands, or even tens of thousands of people. You will learn the basics of logging in, navigation, setting up and sending a broadcast, creating recipient lists, creating messages, viewing progress reports, your user account settings, as well as some great tips for making SchoolMessenger Communicate a big success for your school. Once you are comfortable with the basic features of and the steps outlined in this guide, you can find more information in the more detailed guides, such as the Advanced Training Guide.
Before You Begin
Before you log in and start familiarizing yourself with the system, please take a moment to bookmark the login page for your account on any computers you could potentially use to send notifications. You should also write down the web address and carry it with you. However, please do not write your password anywhere alongside your web address and/or login. Likewise, we strongly discourage allowing browsers to save your password on any computer or device that may, at any time, be accessible by anyone other than yourself.
- Open a web browser
- To launch SchoolMessenger, copy and paste the following URL into your address bar, or click https://asp.schoolmessenger.com/rosevillecity/
- Add the login page to your bookmarks/favorites.
Getting Started
Now that you have bookmarked your login page and have logged in to the system, you are ready to take the first steps in learning Communicate.
A Quick Overview
Communicate is used to send mass notifications, also referred to as broadcasts. We refer to our notifications as broadcasts because of the massive number of destinations to which we can simultaneously deliver your message.
Available broadcast destinations include Phone, Email, SMS Text, Facebook, Twitter, RSS feeds and Push Notifications. It is just as fast and simple to send a message to a small group of people as it is to send one to hundreds, thousands or even tens of thousands of people. All Communicate needs is the appropriate contact data for what we refer to as your “recipients”.
Your recipients’ contact data comes from PowerSchool, through a automated upload at 3:00 AM daily managed by Technology Services. By automating the upload process, any changes to phone numbers, emails and contact preferences should be current on every broadcast.
The Dashboard
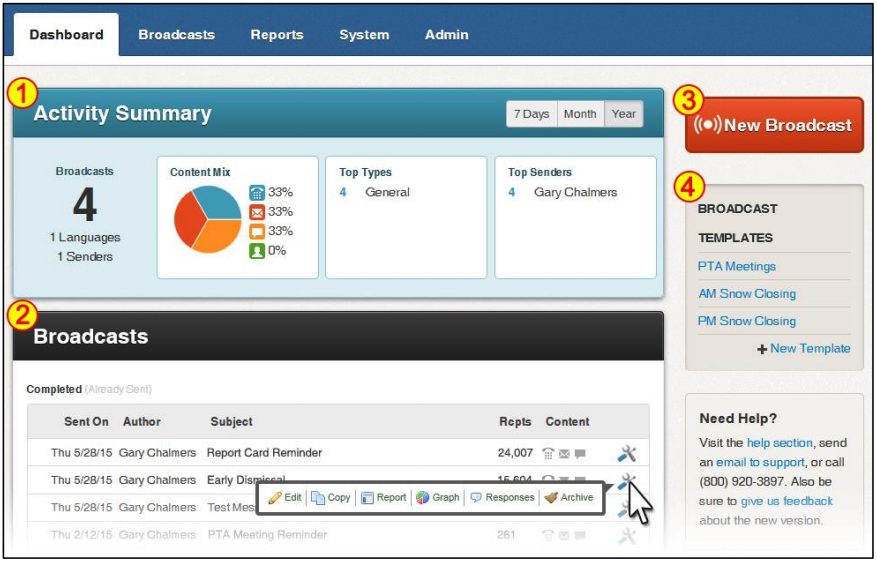
The Dashboard is the first screen you see when you log in to Communicate and gives a high-level view of the activity on your account, as well as the ability to send a new broadcast quickly. You will find the following tools and information on your Dashboard:
- Activity Summary: This section gives you an overview of how frequently your account is being used and what it is being used for. You can see the total number of broadcasts sent from your account, the mix of voice, email, text message, and social media (such as Facebook or RSS feeds). You can also see the most common types of broadcasts and which users are sending the most. You are able to filter whether the summary shows the last seven days, the last month, or the last year worth of results.
- Broadcasts: This section displays broadcasts that are currently in progress, and those that have recently been completed. If you move your pointer over the tool icon next to a broadcast, a menu of common actions for broadcasts pops up including Edit, Copy, Report, Graph, Responses, Archive and Cancel, depending on whether the broadcast is in progress or complete.
- New Broadcast: Clicking the red “New Broadcast” button takes you directly to the steps to begin creating a broadcast. It is the quickest way to get a broadcast configured and sent. We will be using this feature to send a message as part of this training guide.
- Broadcast Templates: Broadcast Templates are pre-configured broadcast set-ups for messages that you might send frequently or wish to have instantly available for emergencies. These are covered in greater detail in the Advanced Training Guide.
Now that we’ve become familiar with SchoolMessenger terminology, let’s click Activity and create a broadcast!